Kubernetes in Practice: A Hands-On Guide Using Docker Desktop
Deep dive into Kubernetes using Docker Desktop

If you've containerized applications with Docker and want to explore Kubernetes—a powerful orchestration platform that manages containers at scale - I'll walk you through its fundamentals, architecture, and practical examples using Docker Desktop on Windows.
Why Kubernetes? The Problem It Solves
The Journey: From Single Server to Containers to Orchestration
Imagine you have a web application running in Docker containers. Everything works great on your laptop. But now you need to:
-
Run multiple instances of your app for redundancy
-
Automatically restart a container if it crashes
-
Distribute traffic across instances
-
Update your app without downtime
-
Scale up when traffic increases, scale down when it doesn't
-
Manage networking between services
-
Store persistent data across container restarts
-
Monitor health and rollback bad deployments
You could script all of this with Docker Compose, but it quickly becomes unwieldy. Enter Kubernetes: a container orchestration platform that handles all of this—and much more—automatically.
What Kubernetes Gives You
-
Declarative configuration — Describe what you want, Kubernetes makes it happen
-
Self-healing — Restarts failed containers, replaces dead nodes
-
Automatic scaling — Scale based on CPU, memory, or custom metrics
-
Rolling updates — Deploy new versions without downtime
-
Service discovery — Containers find each other automatically
-
Load balancing — Distribute traffic intelligently
-
Storage orchestration — Manage persistent volumes
-
Multi-cloud ready — Run on AWS, Azure, GCP, or on-premises
Kubernetes Architecture: Understanding the Big Picture
The Three-Level Hierarchy
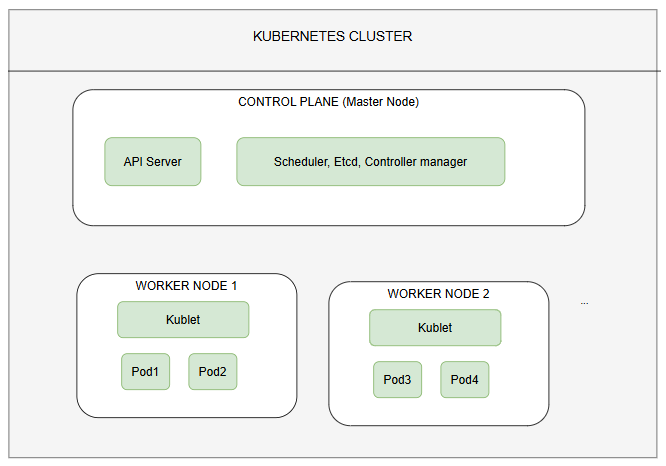
Key Components Explained
Control Plane (Master): The brain of Kubernetes. Runs on one or more nodes and includes:
-
API Server — Accepts kubectl commands and manages the cluster state
-
Etcd — Distributed key-value store that holds all cluster data
-
Scheduler — Assigns pods to nodes based on resource requirements
-
Controller Manager — Runs background processes (ReplicaSets, Deployments, etc.)
Worker Nodes: Machines (VMs or physical servers) that run your containerized applications. Each node runs:
-
Kubelet — Kubernetes agent that communicates with the control plane and manages pods
-
Container Runtime — Docker, containerd, or CRI-O (pulls and runs images)
-
Kube-proxy — Handles networking and service routing
Cluster: A collection of nodes (master + workers) orchestrated together as a single unit.
Core Concepts
1. Pods: The Smallest Deployable Unit
A pod is the smallest unit in Kubernetes—a wrapper around one or more containers.
Key points:
-
Usually contains a single container (but can have multiple for tightly coupled containers)
-
Containers in a pod share networking (same IP address, can communicate via localhost)
-
Ephemeral—created and destroyed as needed
-
Rarely created directly; managed by higher-level constructs like Deployments
# A simple pod (don't use this directly in practice)
apiVersion: v1
kind: Pod
metadata:
  name: my-app-pod
spec:
  containers:
  - name: my-app
    image: my-username/my-app:1.0
    ports:
    - containerPort: 80
2. Deployments: Declarative App Management
A Deployment is the standard way to run applications. It manages:
-
Creating and scaling pods
-
Rolling updates (gradual replacement of old pods with new ones)
-
Rollback to previous versions
-
Self-healing (restarts crashed pods)
apiVersion: apps/v1
kind: Deployment
metadata:
  name: my-app
spec:
  replicas: 3  # Run 3 copies
  selector:
    matchLabels:
      app: my-app
  template:
    metadata:
      labels:
        app: my-app
    spec:
      containers:
      - name: my-app
        image: my-username/my-app:1.0
        ports:
        - containerPort: 80
What happens when you apply this:
-
Kubernetes creates a ReplicaSet
-
The ReplicaSet creates 3 pods
-
The kubelet on worker nodes starts the containers
-
If a pod crashes, the ReplicaSet creates a replacement
-
If you scale to 4 replicas, a new pod is created
3. Services: Stable Networking
Pods are ephemeral—they come and go. A Service provides a stable endpoint to access pods, even as they're replaced.
Three types of Services:
# Type 1: ClusterIP (internal only)
apiVersion: v1
kind: Service
metadata:
  name: my-app-service
spec:
  type: ClusterIP
  selector:
    app: my-app
  ports:
  - port: 80
    targetPort: 8080

---

# Type 2: NodePort (expose on worker node ports)
apiVersion: v1
kind: Service
metadata:
  name: my-app-nodeport
spec:
  type: NodePort
  selector:
    app: my-app
  ports:
  - port: 80
    targetPort: 8080
    nodePort: 30001  # Access on node-ip:30001

---

# Type 3: LoadBalancer (external load balancer)
apiVersion: v1
kind: Service
metadata:
  name: my-app-lb
spec:
  type: LoadBalancer
  selector:
    app: my-app
  ports:
  - port: 80
    targetPort: 8080
4. Labels and Selectors: Organizing Your Cluster
Labels are key-value pairs attached to objects. Selectors find objects by label.
# Pod with labels
metadata:
  labels:
    app: my-app
    environment: production
    version: 1.0

---

# Service selects pods by label
spec:
  selector:
    app: my-app          # Selects all pods with app=my-app
    environment: production
This loose coupling is powerful—you can have one Service route to multiple Deployments with matching labels.
5. Namespaces: Logical Isolation
Namespaces partition a cluster into logical groups. Default is default.
# Create a namespace
kubectl create namespace my-project

# List namespaces
kubectl get namespaces

# Deploy to specific namespace
kubectl apply -f deploy.yaml --namespace my-project

# Or in your YAML
metadata:
  namespace: my-project
Setting Up Kubernetes on Docker Desktop (Windows)
Step 1: Install Docker Desktop
-
Download Docker Desktop for Windows from https://www.docker.com/products/docker-desktop
-
During installation, ensure "Use WSL 2 instead of Hyper-V" is selected (gives better performance)
-
Complete the installation and restart your computer
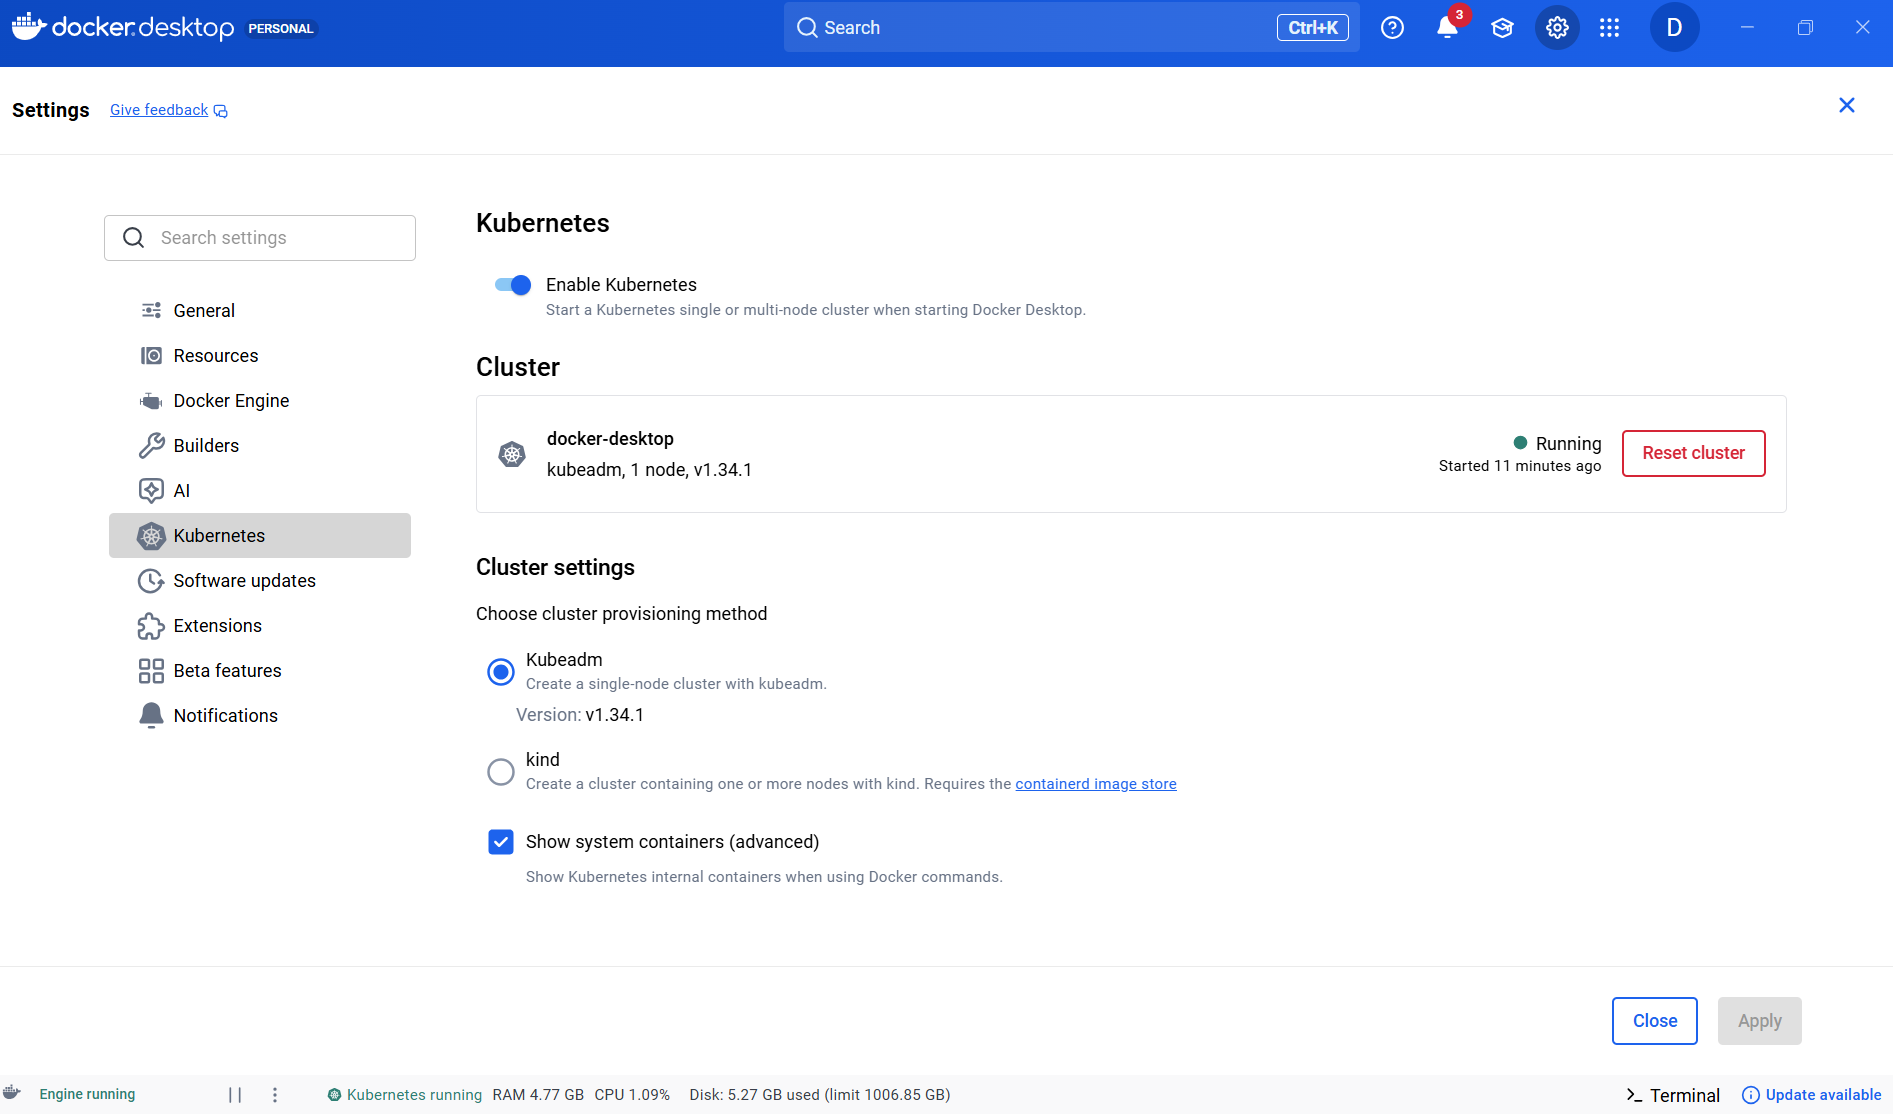
Step 2: Enable Kubernetes in Docker Desktop
-
Open Docker Desktop
-
Click the Settings (gear icon) in the top-right
-
Navigate to Kubernetes tab
-
Check "Enable Kubernetes"
-
Click "Apply & Restart"
-
Wait for the status to show "Kubernetes is running" (can take 2-5 minutes)
Step 3: Verify Installation
Open PowerShell and verify:
# Check kubectl version
kubectl version --client

# Check cluster info
kubectl cluster-info

# Get cluster nodes
kubectl get nodes

# Get system pods
kubectl get pods --namespace kube-system
Expected output shows your Docker Desktop node running system components like coredns, etcd, kube-apiserver, etc.
Step 4: Set Up kubectl Context (Optional but Useful)
# View current context
kubectl config current-context

# View all contexts
kubectl config get-contexts

# Switch context (if you have multiple clusters)
kubectl config use-context docker-desktop
Step 5: Set Up Ubuntu WSL (Optional but Highly Recommended)
While Kubernetes works with PowerShell alone, using Ubuntu WSL provides a professional Linux environment where all documentation examples work perfectly.
-
Check available distros:
wsl --list --online -
Install Ubuntu 22.04:
wsl --install -d Ubuntu-22.04 -
Set as default:
wsl --set-default Ubuntu-22.04 -
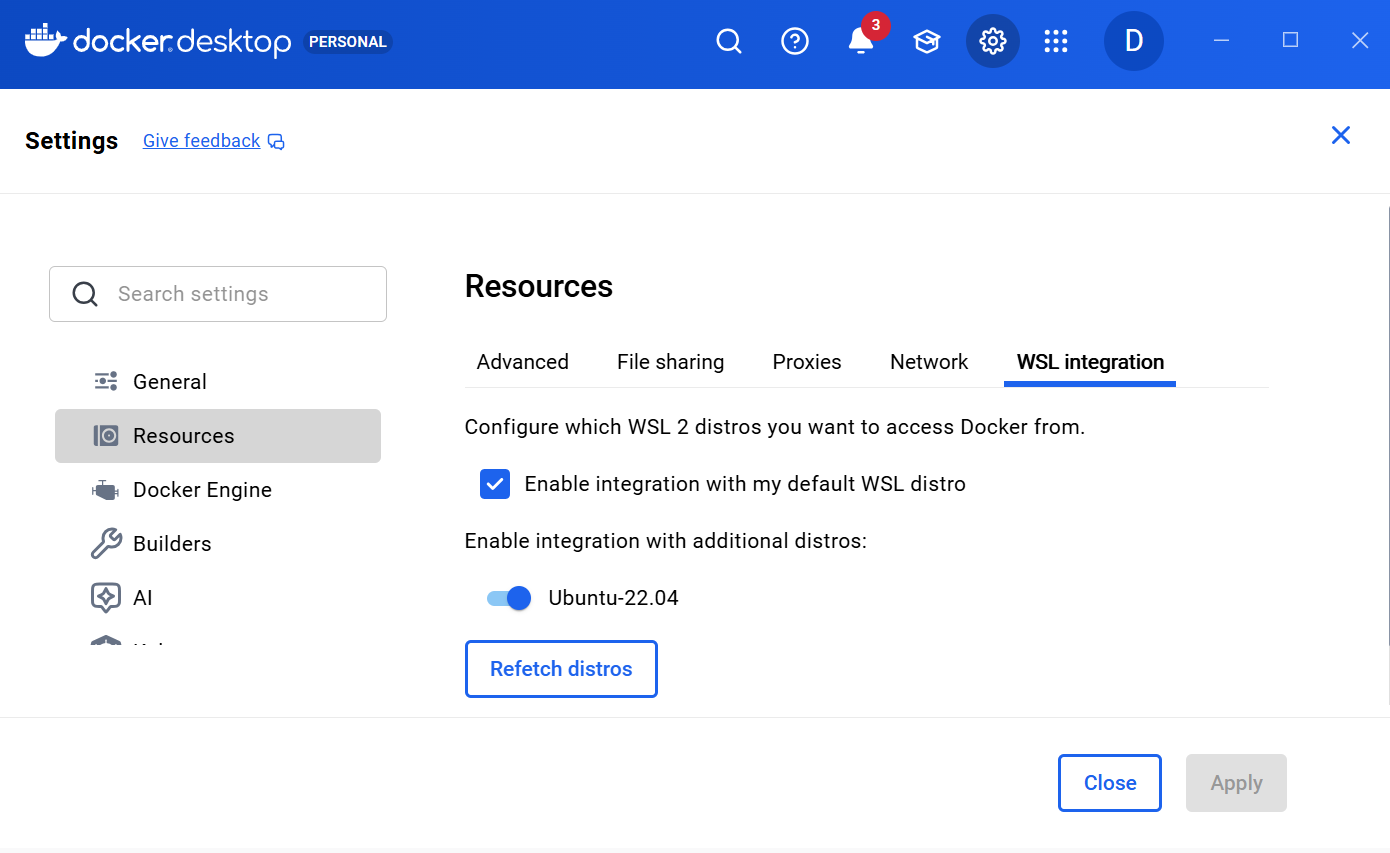
Enable Docker Desktop integration
-
Open Docker Desktop > Settings > Resources > WSL integration
-
Enable "Enable integration with my default WSL distro"
-
Check "Ubuntu-22.04"
-
Click "Apply & Restart"
-
-
Open ubuntu terminal and Verify
kubectl version --clientanddocker --version
From now on open Ubuntu terminal from Start Menu and run all commands there. If you prefer PowerShell - everything still works! Just use findstr instead of grep and adjust paths as needed.
Your First Deployment
Step 1: Create a Simple Application
Let's create a simple HTTP server that returns the current time.
Create a folder called timeserver and create two files:
from http.server import ThreadingHTTPServer, BaseHTTPRequestHandler
from datetime import datetime

class RequestHandler(BaseHTTPRequestHandler):
    def do_GET(self):
        self.send_response(200)
        self.send_header('Content-type', 'text/plain')
        self.end_headers()
        now = datetime.now()
        response_string = now.strftime("The time is %-I:%M %p UTC.\n")
        self.wfile.write(bytes(response_string, "utf-8"))

def start_server():
    try:
        server = ThreadingHTTPServer(('0.0.0.0', 80), RequestHandler)
        print(f"Server listening on port 80")
        server.serve_forever()
    except KeyboardInterrupt:
        server.shutdown()

if __name__ == "__main__":
    start_server()
Dockerfile:
FROM python:3.12-slim

ENV PYTHONUNBUFFERED=1

COPY . /app
WORKDIR /app

CMD ["python3", "server.py"]
docker-compose.yaml (for local testing):
services:
  timeserver:
    build: .
    ports:
      - "8080:80"
Step 2: Build and Test Locally
cd timeserver

# Build the Docker image
docker build -t timeserver:1.0 .

# Verify list of images
docker images

# Test locally
docker run -it -p 8080:80 timeserver:1.0

# Visit http://localhost:8080 in your browser
# You should see: "The time is X:XX PM UTC."
Step 3: Push to Docker Hub
# Log in to Docker Hub
docker login

# Tag your image (use your Docker Hub username)
docker tag timeserver:1.0 YOUR_USERNAME/timeserver:1.0

# Push to Docker Hub
docker push YOUR_USERNAME/timeserver:1.0
Step 4: Create Deployment and Service Files
Create deploy.yaml:
apiVersion: apps/v1
kind: Deployment
metadata:
  name: timeserver
  labels:
    app: timeserver
spec:
  replicas: 3  # Run 3 instances
  selector:
    matchLabels:
      app: timeserver
  template:
    metadata:
      labels:
        app: timeserver
    spec:
      containers:
      - name: timeserver
        image: YOUR_USERNAME/timeserver:1.0
        ports:
        - containerPort: 80
        resources:
          requests:
            memory: "64Mi"
            cpu: "100m"
          limits:
            memory: "128Mi"
            cpu: "200m"
Create service.yaml:
apiVersion: v1
kind: Service
metadata:
  name: timeserver-service
spec:
  type: LoadBalancer
  selector:
    app: timeserver
  ports:
  - port: 80
    targetPort: 80
    protocol: TCP
Step 5: Deploy to Kubernetes
# Apply the deployment
kubectl apply -f deploy.yaml

# Apply the service
kubectl apply -f service.yaml

# Check deployment status
kubectl get deployments

# Check pods
kubectl get pods

# Expected output:
# NAME                         READY   STATUS    RESTARTS   AGE
# timeserver-7f8d9c2b4-abc12   1/1     Running   0          10s
# timeserver-7f8d9c2b4-def45   1/1     Running   0          10s
# timeserver-7f8d9c2b4-ghi78   1/1     Running   0          10s

# Check service
kubectl get services

# Expected output:
# NAME                 TYPE           CLUSTER-IP      EXTERNAL-IP   PORT(S)        AGE
# kubernetes           ClusterIP      10.96.0.1       <none>        443/TCP        2d
# timeserver-service   LoadBalancer   10.96.204.238   localhost     80:30674/TCP   10s
Step 6: Access Your Service
For Docker Desktop on Windows, the EXTERNAL-IP shows as localhost:
# Option 1: Visit in browser
http://localhost

# Option 2: Use curl
curl http://localhost

# Option 3: Port forward to a specific pod
kubectl port-forward svc/timeserver-service 8888:80
# Then visit http://localhost:8888
Step 7: View Logs
# View logs from all pods in the deployment
kubectl logs -f deployment/timeserver

# View logs from a specific pod
kubectl logs -f pod/timeserver-7f8d9c2b4-abc12

# View logs from the previous run (if pod restarted)
kubectl logs -p pod/timeserver-7f8d9c2b4-abc12
Services: Exposing Your Applications
Service Types Explained
ClusterIP (Default)
-
Internal-only, not accessible from outside the cluster
-
Use for service-to-service communication within your cluster
-
Most common for internal APIs and databases
apiVersion: v1
kind: Service
metadata:
  name: internal-api
spec:
  type: ClusterIP
  selector:
    app: api
  ports:
  - port: 8080
    targetPort: 8080
NodePort
-
Exposes service on a port (30000-32767) on every node
-
Accessible from outside via
<NODE-IP>:NODE-PORT -
Useful for bare-metal clusters or when you don't have a load balancer
spec:
  type: NodePort
  ports:
  - port: 80
    targetPort: 80
    nodePort: 30001
LoadBalancer
-
Provisions an external load balancer (cloud provider feature)
-
On Docker Desktop, shows as
localhost -
Each service gets a unique external IP
-
Recommended for production internet-facing apps
spec:
  type: LoadBalancer
  ports:
  - port: 80
    targetPort: 80
Service Discovery: How Pods Find Each Other
Kubernetes injects DNS entries for services. A pod can reach another service via:
# Within same namespace
http://service-name:port

# From different namespace
http://service-name.namespace-name:port
Example: A web frontend accessing a backend API:
# Backend Deployment
apiVersion: apps/v1
kind: Deployment
metadata:
  name: api
spec:
  replicas: 2
  selector:
    matchLabels:
      app: api
  template:
    metadata:
      labels:
        app: api
    spec:
      containers:
      - name: api
        image: my-api:1.0
        ports:
        - containerPort: 8080

---

# API Service (ClusterIP)
apiVersion: v1
kind: Service
metadata:
  name: api-service
spec:
  type: ClusterIP
  selector:
    app: api
  ports:
  - port: 8080
    targetPort: 8080

---

# Frontend Deployment (accesses API via service name)
apiVersion: apps/v1
kind: Deployment
metadata:
  name: web
spec:
  replicas: 2
  selector:
    matchLabels:
      app: web
  template:
    metadata:
      labels:
        app: web
    spec:
      containers:
      - name: web
        image: my-web:1.0
        ports:
        - containerPort: 3000
        env:
        - name: API_URL
          value: "http://api-service:8080"
Scaling and Managing Resources
Manual Scaling
# Scale to 5 replicas
kubectl scale deployment timeserver --replicas=5

# Check updated deployment
kubectl get pods

# Scale back down
kubectl scale deployment timeserver --replicas=2
Or update deploy.yaml and reapply:
spec:
replicas: 10 # Changed from 3kubectl apply -f deploy.yamlHorizontal Pod Autoscaling (HPA)
Automatically scale based on CPU usage:
apiVersion: autoscaling/v2
kind: HorizontalPodAutoscaler
metadata:
  name: timeserver-hpa
spec:
  scaleTargetRef:
    apiVersion: apps/v1
    kind: Deployment
    name: timeserver
  minReplicas: 2
  maxReplicas: 10
  metrics:
  - type: Resource
    resource:
      name: cpu
      target:
        type: Utilization
        averageUtilization: 70
  - type: Resource
    resource:
      name: memory
      target:
        type: Utilization
        averageUtilization: 80
Resource Requests and Limits
Always define resource requests and limits:
resources:
  requests:
    memory: "64Mi"
    cpu: "100m"           # 0.1 CPU cores
  limits:
    memory: "128Mi"
    cpu: "500m"           # 0.5 CPU cores
What these mean:
-
requests— Minimum guaranteed resources; scheduler uses this to place pods -
limits— Maximum allowed; pod is killed if it exceeds limits -
100m(millicore) = 0.1 CPU core;1000m= 1 full core
View Resource Usage (Optional: Metrics Server)
Docker Desktop doesn't include metrics by default. Install metrics server:
# Install metrics server
kubectl apply -f https://github.com/kubernetes-sigs/metrics-server/releases/latest/download/components.yaml

# Patch for Docker Desktop (required)
kubectl patch deployment metrics-server -n kube-system --type='json' -p='[
  {"op": "add", "path": "/spec/template/spec/containers/0/args/-", "value": "--kubelet-insecure-tls"},
  {"op": "add", "path": "/spec/template/spec/containers/0/args/-", "value": "--kubelet-preferred-address-types=InternalIP"}
]'

# Test
kubectl top nodes
kubectl top pods
Ingress: Advanced HTTP Load Balancing
Ingress lets you:
-
Route multiple services under a single IP
-
Use hostnames for routing (example.com → service1, api.example.com → service2)
-
Handle TLS/HTTPS
-
Reduce load balancer costs (one LB for many services)
Basic Ingress Example
apiVersion: networking.k8s.io/v1
kind: Ingress
metadata:
  name: my-ingress
spec:
  rules:
  - host: example.com
    http:
      paths:
      - path: /
        pathType: Prefix
        backend:
          service:
            name: timeserver-service
            port:
              number: 80
  - host: api.example.com
    http:
      paths:
      - path: /
        pathType: Prefix
        backend:
          service:
            name: api-service
            port:
              number: 8080
Ingress with TLS/HTTPS
Create a self-signed certificate:
# Generate private key
openssl genrsa -out example.key 2048

# Generate certificate signing request
openssl req -new -key example.key -out example.csr -subj "/CN=example.com"

# Self-sign the certificate
openssl x509 -req -days 365 -in example.csr -signkey example.key -out example.crt
Create a Kubernetes secret:
kubectl create secret tls my-tls-cert --cert=example.crt --key=example.keyReference in Ingress:
apiVersion: networking.k8s.io/v1
kind: Ingress
metadata:
  name: my-ingress-tls
spec:
  tls:
  - hosts:
    - example.com
    secretName: my-tls-cert
  rules:
  - host: example.com
    http:
      paths:
      - path: /
        pathType: Prefix
        backend:
          service:
            name: timeserver-service
            port:
              number: 80
Note on Docker Desktop
Docker Desktop's built-in Ingress controller may not work on Windows. For testing:
-
Use
kubectl port-forwardto access services directly -
Or deploy an Ingress controller like NGINX (beyond this guide's scope)
Practical Patterns and Best Practices
Pattern 1: Rolling Updates
By default, Deployments do rolling updates—replacing old pods gradually with new ones.
# Update the image
kubectl set image deployment/timeserver timeserver=YOUR_USERNAME/timeserver:2.0

# Watch the rollout
kubectl rollout status deployment/timeserver

# View rollout history
kubectl rollout history deployment/timeserver

# Rollback to previous version
kubectl rollout undo deployment/timeserver
Or update deploy.yaml:
spec:
  strategy:
    type: RollingUpdate
    rollingUpdate:
      maxSurge: 1        # Max 1 extra pod during update
      maxUnavailable: 0  # Never have 0 available
Pattern 2: Health Checks
Kubernetes can restart unhealthy pods:
containers:
- name: timeserver
  image: timeserver:1.0
  ports:
  - containerPort: 80

  # Liveness probe: is the pod alive?
  livenessProbe:
    httpGet:
      path: /health
      port: 80
    initialDelaySeconds: 10
    periodSeconds: 10

  # Readiness probe: is it ready for traffic?
  readinessProbe:
    httpGet:
      path: /ready
      port: 80
    initialDelaySeconds: 5
    periodSeconds: 5
Pattern 3: ConfigMaps and Secrets
Store configuration separately from code:
ConfigMap (non-sensitive):
apiVersion: v1
kind: ConfigMap
metadata:
  name: app-config
data:
  APP_ENV: "production"
  LOG_LEVEL: "info"
Secret (sensitive):
kubectl create secret generic db-credentials \
  --from-literal=username=admin \
  --from-literal=password=secret123
Use in Deployment:
spec:
  containers:
  - name: app
    image: my-app:1.0
    envFrom:
    - configMapRef:
        name: app-config
    - secretRef:
        name: db-credentials
Pattern 4: Init Containers
Run setup tasks before the main container:
spec:
  initContainers:
  - name: migrate-db
    image: my-app:1.0
    command: ['python', 'migrate.py']
  containers:
  - name: app
    image: my-app:1.0
    ports:
    - containerPort: 8080
Pattern 5: Sidecar Containers
Run a helper container alongside the main app:
spec:
  containers:
  - name: app
    image: my-app:1.0
    ports:
    - containerPort: 8080

  - name: log-collector
    image: fluent-bit:latest
    # Reads logs and forwards them
Troubleshooting Common Issues
Issue 1: Pod Stuck in "Pending"
# Check what's wrong
kubectl describe pod <pod-name>

# Look for the "Events" section at the bottom
Common causes:
-
Insufficient resources (node doesn't have enough CPU/memory)
-
Image pull errors (image doesn't exist or wrong registry)
-
Persistent volume not available
Solution:
# Scale down other deployments to free resources
kubectl scale deployment my-other-app --replicas=0

# Or increase node resources (in Docker Desktop settings)
Issue 2: CrashLoopBackOff
Pod keeps restarting—usually an application error.
# View logs from the crashed pod
kubectl logs <pod-name>

# View logs from previous run
kubectl logs -p <pod-name>

# View more details
kubectl describe pod <pod-name>
Issue 3: ImagePullBackOff
Kubernetes can't pull the image.
# Verify image name and tag are correct
# Check image exists on Docker Hub
curl -s https://hub.docker.com/v2/repositories/YOUR_USERNAME/timeserver | jq '.results[].name'

# If using private registry, create image pull secret
kubectl create secret docker-registry regcred \
  --docker-server=<registry> \
  --docker-username=<username> \
  --docker-password=<password>

# Use in deployment
spec:
  imagePullSecrets:
  - name: regcred
Issue 4: Service Can't Reach Pod
# Check pods have correct labels
kubectl get pods --show-labels

# Check service selector matches pod labels
kubectl get svc <service-name> -o yaml | grep selector

# Test connectivity within cluster
kubectl run -it debug --image=alpine -- sh
/ # wget -O- http://service-name:port
Issue 5: Persistent Data Lost After Pod Restart
Pods don't have persistent storage by default. Use PersistentVolumeClaims:
apiVersion: v1
kind: PersistentVolumeClaim
metadata:
  name: app-storage
spec:
  accessModes:
    - ReadWriteOnce
  resources:
    requests:
      storage: 1Gi

---

apiVersion: apps/v1
kind: Deployment
metadata:
  name: app-with-storage
spec:
  replicas: 1
  selector:
    matchLabels:
      app: app
  template:
    metadata:
      labels:
        app: app
    spec:
      containers:
      - name: app
        image: my-app:1.0
        volumeMounts:
        - name: storage
          mountPath: /data
      volumes:
      - name: storage
        persistentVolumeClaim:
          claimName: app-storage
Useful Debugging Commands
# Get all resources in cluster
kubectl get all

# Get all resources in a namespace
kubectl get all -n my-namespace

# Watch pods in real-time
kubectl get pods -w

# Get YAML of a resource
kubectl get pod <name> -o yaml

# Describe a resource (more details)
kubectl describe pod <name>

# Execute command in pod
kubectl exec -it <pod-name> -- bash

# Port forward to debug
kubectl port-forward <pod-name> 8080:8080

# Check events (what's happening)
kubectl get events --sort-by='.lastTimestamp'
Cleanup
When you're done:
# Delete specific resources
kubectl delete deployment timeserver
kubectl delete service timeserver-service
kubectl delete ingress my-ingress

# Or delete all in a YAML file
kubectl delete -f deploy.yaml -f service.yaml

# Delete entire namespace
kubectl delete namespace my-project

# Disable Kubernetes in Docker Desktop (Settings > Kubernetes > Uncheck)
Key Takeaways
-
Kubernetes solves container orchestration at scale — it's not needed for single machines but essential for production
-
Think declaratively — describe what you want, Kubernetes makes it happen
-
Use Deployments, not Pods — Deployments add resilience, scaling, and updates
-
Services provide stable networking — use them to expose and discover applications
-
Always set resource requests and limits — helps scheduler place pods and prevents resource exhaustion
-
Logs, describe, and events are your friends — use them liberally when debugging
-
Start simple — master Deployments and Services before Ingress, StatefulSets, or DaemonSets
-
Use Docker Desktop to learn — it's a perfect environment for developing Kubernetes skills before moving to cloud clusters
Happy containerizing! 🚀
Resources
-
Official Kubernetes Documentation — https://kubernetes.io/docs/
-
Kubernetes Interactive Tutorials — https://kubernetes.io/docs/tutorials/
-
Docker Desktop Documentation — https://docs.docker.com/desktop/
-
Recommended Books — "Kubernetes for Developers", "Kubernetes in action"
Did you find this article useful?